In the realm of safety and preparedness, emergency lights stand as silent sentinels, ready to guide and protect when darkness and uncertainty descend. With a distinct power source that defies even the most formidable power outages, these luminous beacons ensure that critical areas remain illuminated, minimizing panic and ensuring safe passage.

This article delves into the mechanics behind the operation of emergency lights, shedding light on their crucial role in maintaining order during emergencies. From their installation in pivotal locations such as staircases to the familiar presence of fire exit signs, we will explore the fundamentals of how emergency lights work, how to install them effectively, and the importance of regular servicing to guarantee their unfaltering functionality. Join us as we navigate through the intricacies of these unassuming yet life-saving devices.
Emergency lights are crucial safety features present in various establishments and public spaces, serving as fundamental safeguards during emergency scenarios like power failures and fires. These lights are equipped with backup power sources, ensuring illumination in critical areas when primary lighting systems are non-operational. They encompass lighting solutions for essential zones such as staircases and the conventional fire exit signs commonly seen in buildings.
In addition to the evident safety advantages they offer to employees, patrons, and visitors, emergency lights are mandated by legal regulations. Neglecting the installation of proper emergency lighting systems can lead to severe consequences, including substantial fines and punitive measures.
Compliance with Occupational Safety and Health Administration (OSHA) codes necessitates the presence of emergency lighting systems in all commercial structures. The basis for these prerequisites lies in the Life Safety Code, also known as NFPA 101, initially established by the National Fire Protection Association (NFPA).
According to these regulations, buildings must ensure a well-lit path to exits during scenarios like power interruptions, fires, and other emergencies. Moreover, fire exit signs must be conspicuously displayed in commercial establishments, and they must be powered by dependable light sources. For supplementary illumination, emergency lighting accessories like light sticks can also be employed.
The functionality of emergency lights is relatively uncomplicated, comprising a fixture linked to the primary power source, which charges a compact battery. In cases where power to the fixture is disrupted, the internal circuits seamlessly transition to the backup battery, ensuring illumination in the event of a power outage.
Emergency lighting can be categorized into two main types:
Three prevalent and obligatory variations of emergency or exit lights encompass:
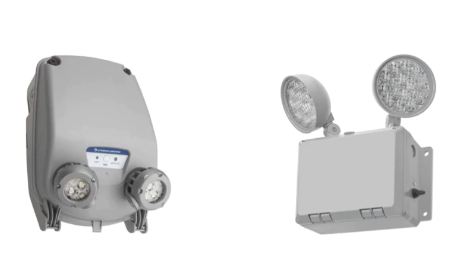
a. Emergency Lights: These lights usually incorporate a pair of lamps housing multiple ultra-bright LEDs. Engineered with a focus on effectiveness and robustness, they are equipped with a prolonged battery lifespan to serve during power interruptions.
b. Exit Signs: Utilizing LED lights for energy efficiency, exit signs are also furnished with backup batteries. Frequently presented as mountable signs ensconced in plastic casings, they typically feature red lettering, although alternative colors and materials are attainable.

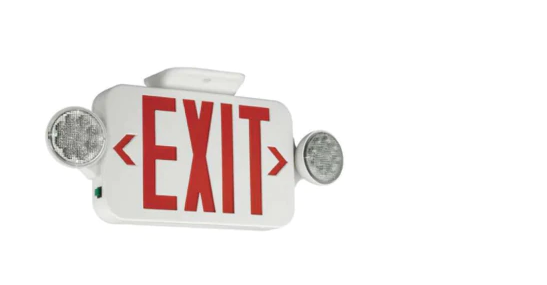
c. Combination emergency lights/exit signs: This commonly integrate an exit indicator alongside a pair of exceptionally luminous LED lamps positioned on each side. These lights serve the dual purpose of providing illumination during power failures while also functioning as exit markers.
Due to their critical significance, it is essential to exercise caution and precision when installing emergency lights, along with ensuring regular maintenance. Installing emergency lights requires a few important steps to guarantee proper installation and optimal functionality. Here’s a breakdown of the process:
a. Professional Guidance: Given the importance of safety, it is highly recommended to seek guidance from an electrician before initiating the installation process. Consulting with an expert ensures compliance with safety protocols and standards. For those who prefer it, professional installation services are also available to guarantee accuracy.
b. Follow Instructions: Whether installing emergency lights yourself or with professional assistance, it’s imperative to closely follow the manufacturer’s instructions provided with the lights. These guidelines offer essential insights into the correct installation procedure.
c. Electrical Connection: Emergency lights are linked to a building’s electrical wiring and are designed to switch to battery power during outages or when a circuit breaker trips. Before installation, confirm that the circuit you are connecting to is switched to the OFF position to prevent the risk of electrocution. Additionally, ensure that the fuse box is clearly marked as “Do Not Energize.”
d. Mounting Methods: There are primarily two ways to mount emergency lights. In most instances, these lights are attached or partially attached to walls or ceilings before the wiring is connected. The installation process involves either using mounting brackets or drilling holes for screws into wall studs.
The proper installation of emergency lights demands precision and adherence to safety procedures. By seeking professional guidance, closely adhering to instructions, and meticulously following recommended practices, you can ensure that your emergency lights are efficiently installed and well-prepared to function during critical situations.
a. Prepare for Wiring: Begin by removing the mounting pattern cutouts from the back plate. This step is essential to create openings for the wires to pass through smoothly.
b. Bushing Installation: Place the supplied bushing into the wire holes. These slender, hollow tubes serve as insulators, ensuring the safe passage of electricity without any contact with the fixture.
c. Connect Wiring: Once the circuit wiring has been drawn through the designated pass hole, proceed to securely attach it to the sign.
a. Prepare for Wiring: Begin by removing the wire pass cutouts situated at the top or side of the unit. This step facilitates the passage of wires.
b. Canopy Attachment: Utilize the provided screws and hardware to affix the canopy either to the power pack or directly to the sign. Ensure a secure connection during this step.
c. Secure Unit to Ceiling or End: Employ the two longest screws to anchor the unit in place. Position these screws in the outer holes of the hanging plate, effectively fastening the unit.
d. Wiring Alignment: Draw the circuit wiring through the central hole in the plate and then fasten the plate securely to the electrical box, ensuring a stable foundation.
e. Route Wiring to Power Pack: Skillfully maneuver the circuit wiring through the designated pass hole into the power pack.
f. Canopy Placement: Position the sign or fixture canopy over the electrical box, ensuring that the longer plate screws seamlessly pass through the corresponding holes.
g. Secure Canopy: Employ the supplied nuts to securely fasten the sign or canopy, effectively affixing it in place.
h. Wire Concealment: Following successful mounting, the circuit wiring is generally concealed by employing metal or thermoplastic housing, adding an extra layer of protection and aesthetic uniformity.
To ensure the proper installation of your emergency lights, you’ll need to establish either two or three connections with your residential or commercial electrical system.
Begin by reviewing the instructions to determine the required voltage for the fixture, which can be either 120 or 277 volts. Next, examine the connection points on the fixture itself. The wires should include the following components:
Proceed to connect the appropriate common and voltage wires from your house’s power supply to the unit, and if your fixture mandates it, the ground wire as well. It may be necessary to use wire strippers or crimpers to remove the wire covering and establish the connection securely.
Importantly, avoid connecting both the 120-volt and 277-volt wires simultaneously, as this could lead to malfunctioning of the light fixture.
In conclusion, emergency lights and exit signs hold paramount significance not only as integral components of safety measures during power failures, fires, and critical situations but also as obligatory elements stipulated by regulations in commercial structures and similar environments.
Complying with legal requirements for safety and emergency lighting is of utmost importance, reinforcing the need to ensure your business’s adherence to these standards. Should the need arise, enlisting professional assistance for the procurement and installation process is a prudent step to take. The well-being of individuals within your sphere, including yourself and your colleagues, hinges on the proper implementation of these measures.
Moreover, augmenting standard fixtures with supplementary accessories like battery backups and emergency light sticks with holders further enhances the preparedness of your emergency lighting system. Devoting time and consideration to tailor your emergency lighting approach to your specific needs is an investment that guarantees tranquility and reassurance for both property owners and occupants alike.
Not sure what you required for your lightining project ?
Get in touch with us for FREE consultation.